

When it comes to optimizing your internet experience, choosing the right DNS (Domain Name System) can make a significant difference in speed, security, and reliability. OpenDNS and Google DNS are two of the most popular and trusted DNS services available today. Whether you’re seeking faster browsing speeds, enhanced security, or improved parental controls, understanding how these DNS services work and how to switch between them can greatly enhance your online experience. In this guide, we’ll compare OpenDNS and Google DNS, explore their key benefits, and walk you through the steps to seamlessly transition to either service. Additionally, we’ll cover cache clearing tips and review some leading DNS competitors to help you make an informed decision. Let’s dive in!
Table of Contents
- What are OpenDNS & Google DNS?
- Why Are OpenDNS & Google DNS Used?
- Benefits of Using OpenDNS & Google DNS
- How to Switch to OpenDNS or Google DNS?
- How to Clear your Browser cache?
- OpenDNS vs Google DNS: Use Cases for Different Needs
- Best Competitors to OpenDNS & Google DNS
- DNS Performance Test Tools: Find the Best DNS for You
- Troubleshooting Common DNS Issues
- Privacy Considerations When Choosing OpenDNS vs Google DNS
- Real-World Examples: How DNS Changes Impact Browsing
What are OpenDNS & Google DNS?
1. OpenDNS:
OpenDNS is a cloud-based domain name system (DNS) service that provides enhanced security, faster browsing speeds, and internet content filtering. It is owned by Cisco and offers both free and paid plans. OpenDNS works by resolving DNS requests faster and allowing users to block unwanted websites (e.g., malicious sites or adult content).
2. Google DNS:
Google Public DNS is a free, global DNS resolution service launched by Google to make the web faster and improve security. Google DNS is one of the largest DNS services in terms of volume and is known for its speed and reliability. It doesn’t provide content filtering like OpenDNS but focuses on enhancing DNS resolution speed and security.
Why Are OpenDNS & Google DNS Used?
- Faster Browsing:
DNS services translate human-readable domain names (like google.com) into IP addresses that computers understand. Public DNS services like OpenDNS and Google DNS provide faster responses compared to default DNS servers provided by ISPs. - Increased Security:
Both services offer enhanced security features:- OpenDNS: Protects against phishing, malware, and botnets through built-in filtering.
- Google DNS: Focuses on providing better security by preventing DNS attacks and improving the safety of the DNS lookup process.
- Improved Reliability:
They provide a more stable and reliable DNS service, avoiding outages that can occur with some local ISPs. - Content Filtering (OpenDNS):
OpenDNS allows users to block access to certain categories of websites (e.g., adult content, gambling), which is particularly useful for parental control or in businesses.
Benefits of Using OpenDNS & Google DNS
OpenDNS Benefits:
- Content Filtering: Ability to block specific domains or types of content.
- Phishing Protection: Proactively blocks malicious sites.
- Usage Statistics: Detailed reports on DNS requests and browsing habits.
- Customizable: Advanced features for business users.
Google DNS Benefits:
- Speed: Optimized for fast performance by distributing DNS lookup requests efficiently across servers.
- Global Coverage: Has servers located worldwide, which ensures faster response times.
- Security: Uses techniques like DNS over HTTPS (DoH) and DNS over TLS (DoT) for improved privacy and security.
How to Switch to OpenDNS or Google DNS?
Note: The techniques in this article & video works in Windows 7, 8, and 10.
Check Video:
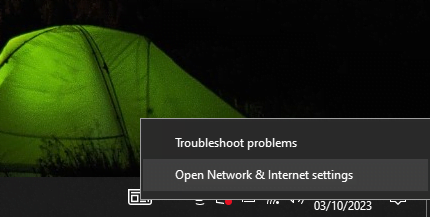
Right-click the network status icon in your system tray, and then click “Open the Network and Sharing Center” on the context menu.
How to Clear your Browser cache?
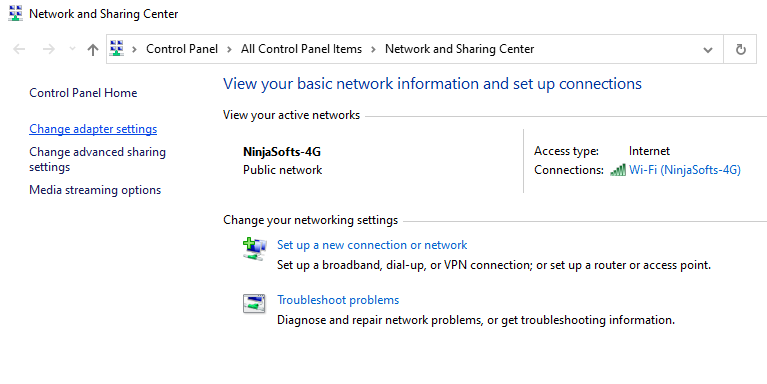
In the “Network and Sharing Center” window, click the “Change adapter settings” link at the upper left.
Check our Web Design Services
In the “Network Connections” window, right-click the connection for which you want to change the DNS settings, and then click “Properties” on the context menu.
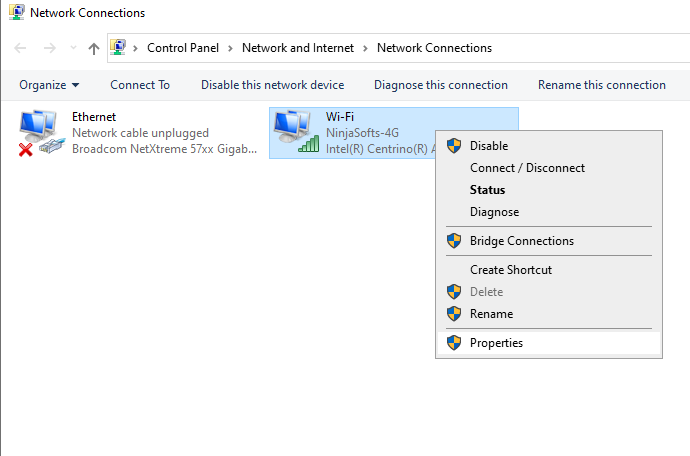
In the properties window, select “Internet Protocol Version 4 (TCP / IPv4)” on the list, and then click the “Properties” button.

The Ultimate Guide of Web Design for Small Businesses
The bottom half of the “Internet Protocol Version 4 (TCP / IPv4) Properties” window shows the DNS settings. Select the “Use the following DNS server addresses” option. Next, type in the IP addresses for the preferred and alternate DNS servers you want to use. Here are the IP addresses for Google DNS and Open DNS:
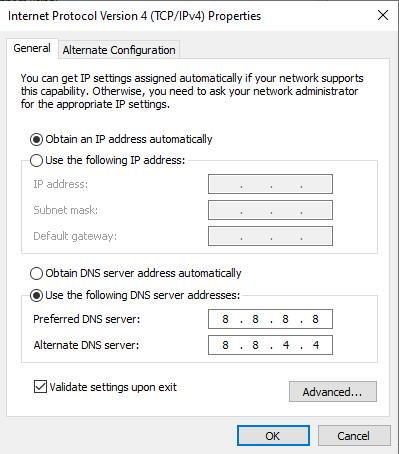
Google DNS
Preferred: 8.8.8.8
Alternate: 8.8.4.4
Preferred: 208.67.222.222
Alternate: 208.67.220.220
We’re using Google DNS in our example, but feel free to use whichever you like. When you’ve typed in the addresses, click the “OK” button.
Case Study: How Ninja Softs Transformed Junior Kids’ Website – Excellence in Web Redesign
OpenDNS vs Google DNS: Use Cases for Different Needs
Not sure whether to use OpenDNS or Google DNS? Here are the best scenarios for each:
- OpenDNS Use Cases:
- Ideal for homes and businesses that need parental controls or content filtering.
- It’s also useful for companies looking to block malware and phishing sites to ensure safer browsing.
- Google DNS Use Cases:
- Best suited for users seeking high-speed, low-latency DNS resolution.
- Ideal for web developers, gamers, and users who need global DNS coverage without content filtering.
Which DNS is Best for Gaming & Streaming?
For Gamers & Streamers – If latency and speed are your top priorities, Google DNS or Cloudflare DNS often deliver better performance for online gaming and 4K streaming. For parents, OpenDNS offers an extra layer of control to block inappropriate content without impacting speed too much.
Best Competitors to OpenDNS & Google DNS
- Cloudflare DNS (1.1.1.1):
Known for speed and privacy, Cloudflare DNS is one of the fastest public DNS services. It emphasizes user privacy by not logging IP addresses.- Primary DNS server: 1.1.1.1
- Secondary DNS server: 1.0.0.1
- Quad9 DNS (9.9.9.9):
A security-focused DNS provider, Quad9 blocks access to malicious websites using threat intelligence from multiple sources.- Primary DNS server: 9.9.9.9
- Secondary DNS server: 149.112.112.112
- Comodo Secure DNS:
Offers fast, reliable, and secure DNS services with built-in protection against malware and phishing websites.- Primary DNS server: 8.26.56.26
- Secondary DNS server: 8.20.247.20
- Norton ConnectSafe:
Provides DNS services focused on security and content filtering, preventing users from accessing malicious websites.- Note: Norton ConnectSafe was discontinued, but alternatives exist in the market for similar functionalities.
DNS Performance Test Tools: Find the Best DNS for You
To identify the most suitable DNS for your network, you can use DNS performance testing tools. These tools provide insights on DNS speed and reliability, helping you make an informed choice:
- DNSPerf: This tool offers real-time performance benchmarks for different DNS services worldwide, letting you see how fast each DNS resolves requests based on location.
- Namebench: An open-source utility that analyzes and compares DNS servers’ performance, helping users find the fastest option for their setup.
- GRC’s DNS Benchmark: Designed for Windows users, this tool tests the performance of public and private DNS servers, ensuring you get the fastest resolution times.
Using these tools not only helps boost browsing speeds but also ensures a smoother, more reliable online experience.
Troubleshooting Common DNS Issues
Encountering issues after switching to OpenDNS or Google DNS? Here’s how to handle some of the most common DNS-related problems:
- DNS Server Not Responding: If you get this error, try switching back to your ISP’s default DNS or a different public DNS to see if the problem persists. Restarting your router or flushing your DNS cache can also help.
- Slow Internet After Switching DNS: If speed decreases after switching DNS, test alternative DNS servers using tools like Namebench. You may need to choose a server closer to your location for better performance.
- How to Flush DNS Cache on Windows/Mac/Linux: Clearing the local DNS cache can resolve connectivity issues. Here’s how:
- Windows: Open Command Prompt and type
ipconfig /flushdns. - Mac: Use the Terminal and enter
sudo killall -HUP mDNSResponder. - Linux: Type
sudo systemctl restart systemd-resolvedin the Terminal.
- Windows: Open Command Prompt and type
Privacy Considerations When Choosing OpenDNS vs Google DNS
When it comes to DNS, privacy is a major concern. Here’s how OpenDNS and Google DNS manage user data:
- OpenDNS Privacy: OpenDNS collects DNS query data to enhance its services, but users can opt for family or business plans that offer additional security features like phishing protection and content filtering.
- Google DNS Privacy: Google Public DNS emphasizes speed and security, utilizing DNS over HTTPS (DoH) and DNS over TLS (DoT) to encrypt DNS requests and enhance privacy. While Google is known for data collection, Google DNS does not tie your browsing history to your Google account.
If you prioritize privacy, consider Cloudflare DNS (1.1.1.1), which is well-known for its no-logs policy and strong encryption protocols.
Real-World Examples: How DNS Changes Impact Browsing
Here are a few real-world scenarios where changing DNS servers led to noticeable improvements:
- Faster Website Loading: Many users reported quicker website loading times after switching to Google DNS, especially in regions with slower ISP DNS services.
- Improved Parental Control: OpenDNS users experienced better parental controls and content filtering, reducing access to inappropriate websites for children.
- Reduced Latency for Gamers: Gamers switching to Google DNS or Cloudflare DNS noticed lower latency during online gaming, leading to smoother gameplay.
These examples show how the right DNS choice can enhance browsing, gaming, and security, further underscoring the importance of having a high-performance website—something Ninja Softs can help you achieve!
Switching to the right DNS can significantly enhance your browsing speed, security, and overall internet experience. Whether you choose OpenDNS or Google DNS, both services offer distinct advantages tailored to various user needs. At Ninja Softs, we understand that a fast and secure internet is crucial not just for users but for businesses as well. A well-designed, high-performance website plays a vital role in this experience. Our expert web design services focus on creating user-friendly, secure, and optimized websites that boost your brand’s online presence.
Frequently Asked Questions
1. Is it safe to use OpenDNS or Google DNS?
Yes. Both are reputable DNS providers known for high uptime, strong security features, and reliable performance. OpenDNS adds content filtering, while Google DNS focuses on speed and privacy enhancements.
2. Will changing my DNS make my internet faster?
In many cases, yes. Switching to a high-performance DNS can reduce the time it takes for websites to load by resolving domain names faster. However, overall speed also depends on your internet connection and device performance.
3. Can I use OpenDNS or Google DNS on my smartphone?
Yes. You can configure DNS settings directly in your phone’s network settings (Wi-Fi or mobile data). Some Android and iOS versions also support DNS over HTTPS for added privacy.
4. What’s the difference between DNS over HTTPS (DoH) and DNS over TLS (DoT)?
Both encrypt DNS queries to protect your privacy. DoH sends DNS requests over HTTPS (like secure websites), while DoT uses a separate encrypted connection over TLS. Many modern DNS services support both.
5. Does OpenDNS cost money?
OpenDNS has a free version with basic features and premium plans for advanced filtering, security, and reporting. Most home users find the free version sufficient.
6. Can I use multiple DNS services at the same time?
You can configure a primary and secondary DNS from different providers (e.g., primary Google DNS, secondary OpenDNS). Your device will try the primary first and switch to the secondary if needed.
7. How do I test which DNS is best for me?
You can use free tools like DNSPerf, Namebench, or GRC’s DNS Benchmark to measure speed, reliability, and latency from your location. The fastest service in these tests is usually the best choice for you.
Ready to elevate your website and offer an outstanding user experience? Connect with us today and let’s build something remarkable together! For more insights on web hosting, DNS, and digital success, explore our blog – where we share expert advice to help you stay ahead in the digital world.
Have a great day! Cheers! 🚀


